Add and manage assets
After you have added assets to your input library you can add them to your cases, defining the number of asset instances and customizing the asset inputs as required.
Add an asset
- Go to Build > Assets.
- Click on + Add.
- Enter the number of asset instances you want to add to your case.
Define the asset instance locations. There are three ways to do this:
- Click Define site area.
- Click Mark corners on map.
- Click three times to mark the corners of the site area on the map.
- Click Populate site.
- Click Place individually on map.
- Click on the map to mark the location for each asset instance in turn.
- Enter the coordinates manually for each asset instance.
- Click Define site area.
- Click Next.
- Complete the asset inputs as required, these include asset tasks and weather data. Check our asset inputs page for a full rundown of the available inputs.
- Click Add.
Other asset options
Click on an asset in your case at any time to access the asset inputs and make any required modifications.
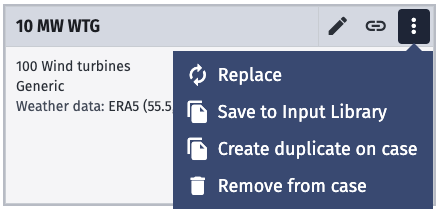
Click on the three-dot menu icon to access additional options:
- Replace
- Select a different asset from your input library to replace the current asset.
- This overwrites all asset inputs.
- Asset instance locations remain the same.
- Save to input library
- Create duplicate on case
- Copies all asset inputs, such as tasks and weather.
- Duplicate asset requires new asset instance locations.
- Remove from case